Episode 166 - Hand Painting Yarn Tutorial

Showing posts with label tutorial. Show all posts
Showing posts with label tutorial. Show all posts
Monday, September 12, 2016


Tuesday, February 16, 2016
Monday, December 7, 2015
The Dyer's Notebook - Episode 146
Episode 146 - The Boring Safety Part
Shownotes
Congratulations to all of the winners of our 1000 member giveaway!
Dyeing
Part 1 of my dyeing tutorial: Materials, Safety, Mixing Dye Stock
Gynx Yarns
Shop update December 8 at 7 pm Central
Podcasts Mentioned
Andre Sue Knits
Food
Vegan Pumpkin Cheesecake (my mom omits the rum)
Shownotes
Congratulations to all of the winners of our 1000 member giveaway!
Dyeing
Part 1 of my dyeing tutorial: Materials, Safety, Mixing Dye Stock
Gynx Yarns
Shop update December 8 at 7 pm Central
Podcasts Mentioned
Andre Sue Knits
Food
Vegan Pumpkin Cheesecake (my mom omits the rum)
Monday, July 6, 2015
Monday, November 5, 2012
The Dyer's Notebook - Episode 7
Episode 7: Epic Self-Striping Tutorial of Doom
Subscribe on iTunes!
Shownotes:
Dyeing
Subscribe on iTunes!
Shownotes:
Week in Review
Self-Striping Tutorial
Ask A Dyer
sablee – “I recently bought gray merino roving and want to
dye it another color. Any suggestions as what color dye I should use to over
dye.”
woolleyblue – “I would like to hear about other tools that
you haven’t yet mentioned such as what you use to skein/reskein, etc. I’m not
sure how you go about getting the yarn in a cone and putting it into a long (?)
skein to dye it then reskein it. Is that correct? thanks!”
Shop Update
Studio Ghlibi Club sign-ups November 1 – November 18
This week’s update: Tuesday, November 6 at 1 pm Central
I’m now on Plurk
Thursday, July 21, 2011
Unraveling a Sweater Part 2: Picking a Sweater (Everything Else)
Yesterday I was in a shopping mood. I ordered a few different things all related to fiber. I can't wait for them to get here and to show them all to you! I won't tell specifically what I got yet, but I got a book, some fiber, and a drop spindle. Expect some reviews in the near future!
Today I'm going to continue my series on recycling yarn from sweaters. This is part two, and you can find part one here.
Today I'm going to continue my series on recycling yarn from sweaters. This is part two, and you can find part one here.
How to Unravel a Sweater Part 2 – Picking A Sweater (Everything Else)
We left off with analyzing the fiber content of the sweater, but there is still so much more to take into account when deciding if a sweater is worthy of your time and effort. Here are the last few things you need to check before you even touch a seam ripper.
Seams
Sweaters are made two ways: either the pieces are knitted (hand or machine) into the shape of each piece and they are sewn together, or large rectangles are knitted and the pieces are cut to fit the shapes needed. The latter situation is what is problematic for us “repurposers”, as if you try to unravel a sweater constructed in this way, you will end up with several short strands of yarn instead of one continuous strand. The way you can tell if your yarn will come out in one piece is to look at the seams. If the seams are serged, then they were cut and sewn together, which is not what you want. If you don’t know what a serged seam looks like, look at the inside of your t-shirt , jeans, or whatever you have laying around. Do you see some seams that look like they have lots of “V”s going over the edge of the fabric that prevent it from fraying? Those are the seams we’re talking about. In a knitted garment, the seams we can use will not have those “V”s crossing over them, and you can separate the two sides from each other. The only place where serged seams aren’t really a problem when unraveling a sweater is at the shoulders. A lot of times, a sweater will have most of the seams sewn together, while the shoulders are serged for more stability. You can cut the sweater at the shoulder seams and only lose a few inches, because it will most likely unravel from the top to bottom.
Color Changes
If you have a sweater with multiple colors, it might be best to skip it. If there are lots of stripes or fair isle, you’ll end up with small strands of yarn. If, however, there are only two or three large horizontal stripes and you don't mind having smaller amounts of different colors, then maybe it is worth it to you to unravel it.
Damage
Check your sweater for any damage. A hole or small stain might not be problematic if it’s near the top or bottom and you don’t mind losing a bit of yarn. If there are multiple stains or holes, it is probably best to not mess with it. Even if you plan on overdyeing, the stains will dye darker than the unstained yarn. Also be sure to check for any signs of felting, especially in the armpits, which can be subjected to warmth, moisture, and friction. If your sweater is felted, you can’t unravel it.
The Obvious Stuff
Sometimes you can get so excited that you've found a sweater that meets all of your requirements that you forget some of the obvious things that make a huge difference. Do you like the color? If not, can you overdye it? Do you like how the fiber feels? If the answers are no, then even if it's okay to unravel, you might not even use it, and are further wasting your time.
The next part of the series we will actually take apart a sweater!
Saturday, July 16, 2011
Unraveling a Sweater Part 1: Picking a Sweater (Fiber)
I said I was going to have pictures of my tank top, but I haven't gotten around to it. I wore it when Jose and I took our engagement photos, so when I get those back I'll post some!
I have been asked by several people how they can recycle sweaters to use the yarn for their projects. There are several tutorials out there, but as this is something very near and dear to my heart that I've been doing for a long time, I plan on giving my very thorough steps, tips, and tricks with this tutorial. This will end up being a series of posts, perhaps once a week, as if I tried to make it one post it would be very long (and believe me, they will probably be long anyway).
Just stay away. In all seriousness, I could see using recycled acrylic for something like dish towels, amigarumi, etc., but I would never use it for garments. That goes for new acrylic as well, though. If you don’t have a hatred of acrylic like me, then by all means, go for it. Just know that it won’t really block and you can’t dye it. You can tint it somewhat with disperse dyes, which are horrible for you and you can only get light shades when dyeing acrylic yarn.
Part 2
I have been asked by several people how they can recycle sweaters to use the yarn for their projects. There are several tutorials out there, but as this is something very near and dear to my heart that I've been doing for a long time, I plan on giving my very thorough steps, tips, and tricks with this tutorial. This will end up being a series of posts, perhaps once a week, as if I tried to make it one post it would be very long (and believe me, they will probably be long anyway).
How to Unravel a Sweater Part 1 – Picking A Sweater (Fiber)
So you’ve decided you want to unravel a sweater to use the yarn for something new. Before you rush out and grab your scissors and the closest sweater to you, there are some things you have to think about before you begin surgery on your unsuspecting garment. Not all sweaters are created equal, and not all sweaters are suitable for unraveling. Here are several things to check out and inspect before you buy a thrift store sweater or ruin that cardigan in your mom’s closet.
Fiber Content
Some of the choice in fiber content will be based on personal preference and what you want to do with the yarn. I know a lot of people who say that you shouldn't unravel anything but wool because nothing else is worth unraveling. I think that is bull, but it just depends on your needs and what you're willing to put up with. I’ll address the fibers I commonly see in thrift stores, but this is not to say that you won't stumble across some fiber I've never seen.
Protein Fibers
Wool
If you find a sweater that is a protein fiber, more often than not, it will not say anything more detailed than “wool” or “lamb’s wool.” This is the more common protein fiber you’ll most likely come across. Wool is normally a good bet, unless of course you’re allergic. Make sure you like the feel of the sweater though, as wool can vary greatly in feel. Wool is great because for the most part it will unravel with spin still in it, you can dye it with acid dyes (professional or kitchen ingredients such as Kool-Aid and food coloring), and if you accidentally make a cut where you should not have, you can splice the ends together, assuming it is not a superwash wool.
Cashmere
I have to restrain myself from making a scene every time I come across a 100% cashmere sweater in a thrift store. It’s like finding gold to me, and I’m sure almost everyone who has felt or owned some cashmere understands. It dyes and felts like wool will, and you can’t beat the softness. Cashmere, however, is a lot more difficult to deal with when unraveling. You have to be very gentle, as it can break very easily. It is best to go slowly when unraveling a cashmere sweater, and finer (thinner) yarn is a lot of times not worth it. I spent weeks unraveling a thread-thick cashmere sweater, and I probably won’t do it again. Also, the “halo” cashmere has makes it get stuck on its self, which only adds to the need to go slowly so as to not break it.
Angora
I’ve never found a 100% angora sweater, but instead blended with wool. Depending on how much angora there is, it can have some of the same problems as cashmere.
Silk
Normally, like angora, when I find silk, it’s blended with wool. A lot of times this yarn will come out very under-plied, but that might not be an issue for you.
Plant Fibers
Plant fibers (cotton, linen,etc.) tend to come out not plied at all, but instead lots of small strands together. This can be a pain to deal with, and if yarn splitting while you knit drives you crazy, steer clear. Also, if you make a mistake and cut the yarn, you can’t felt it back together. I have unraveled several cotton sweaters with success though, especially because I live in Texas and cotton is more practical for lots of things. If you can deal with the underplied yarn, there is no reason why you shouldn’t give it a try, especially if you’re allergic to wool. You will also be able to dye it if you have the equipment to dye plant fibers, like fiber-reactive dye. If wanting to use a safer at-home dye method, like Kool Aid, plant fibers will not work.
Synthetics
Rayon
Technically a synthetic fiber, even though it’s made from wood chips, rayon has most of the same qualities as the plant fibers. I’ve used several cotton/rayon blends with success. I’ve only unraveled one 100% rayon sweater and I haven’t used it yet, but I wouldn’t think there would be an issue compared to new rayon wool. This can also be dyed with fiber-reactive dyes.
Nylon
Although it is synthetic, nylon will dye with acid dyes. If I wool sweater has some nylon in it, I will still use it.
Acrylic
Just stay away. In all seriousness, I could see using recycled acrylic for something like dish towels, amigarumi, etc., but I would never use it for garments. That goes for new acrylic as well, though. If you don’t have a hatred of acrylic like me, then by all means, go for it. Just know that it won’t really block and you can’t dye it. You can tint it somewhat with disperse dyes, which are horrible for you and you can only get light shades when dyeing acrylic yarn.
Part 2
Thursday, July 7, 2011
Throwback Tutorial - How to Make Leggings Without a Pattern.
I made this tutorial back in 2008 after some people had seen the leggings I'd made and wanted some basic instructions. Looking back, there are a few things I'd change because of things I've learned, and I'll address those as they come up. I originally posted this over on the Craftster forum back in 08, so if you've seen this before, don't worry, it's not déjà vu.
This has been copied and pasted from my original 08 tutorial. Notes I made today will be in parenthesis and in italics.
Tutorial:
Okay, so I promised this a while ago and just got around to it today. I couldn't find any fabric I wanted at first and I've been busy getting ready to head off to college next month. I've never written a tutorial for anyone before, so please ask me questions if I've worded something oddly or something doesn't make sense.
Materials:
1 yard (possibly more depending on your size) stretchy knit fabric (I like the kinds in the dancewear section.) (I wear around a size 6, if that gives you any idea. If you can wrap the fabric around you like a skirt and have a good amount left over on the sides, you're probably good.)
Matching thread
A pair of leggings or skinny jeans that fit you
Tutorial Notes:
Because we are using a stretchy fabric, I am using a stretch stitch on my machine. A serger would also work. I also sewed over each seam twice because they will be stretched so much and I wanted to add strength. If you aren't very experienced with sewing this kind of fabric, then please practice on some of your extra scraps left over from the pattern to get your settings right on your machine before risking ruining your leggings. (I've also heard of people doing a couple of rows of zig-zag stitches instead)
The process:
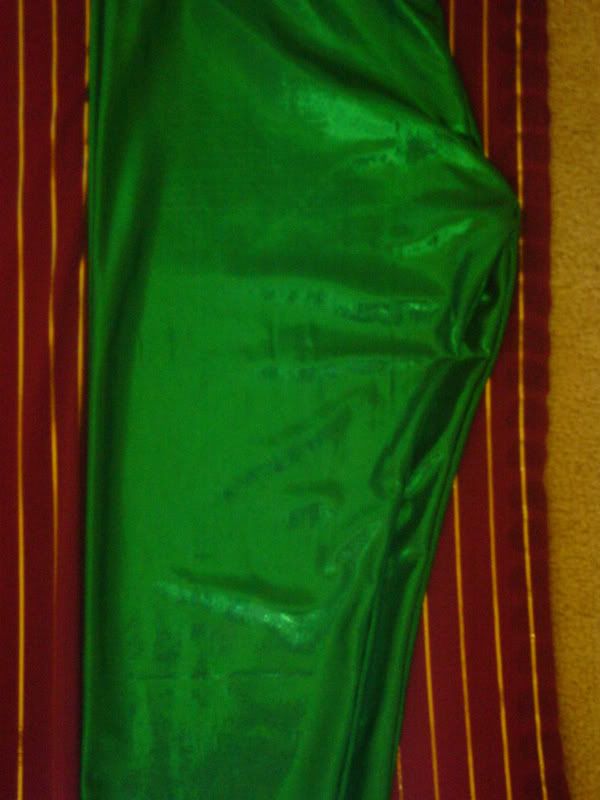
Lay out your fabric. Fold your leggings/jeans in half and lay out as seen in picture (except neater, I kind of just threw it down for the picture). Trace along the top, down the curvy side (the side with the crotch) and across the bottom, remembering to figure in seam allowances. Note: You may want to add more length to the bottom and/or top, just depending on what you're using to trace. (I made these leggings when I was 18 and didn't...um... have much in the booty department, so it didn't matter that the front was the same as the back. Since then I've been lifting weights and am a bit more well endowed in that area, I'd need to accommodate that by making the curved part more "shallow" on one side of each leg. I will link to a YouTube video at the end of this that shows what I mean.)
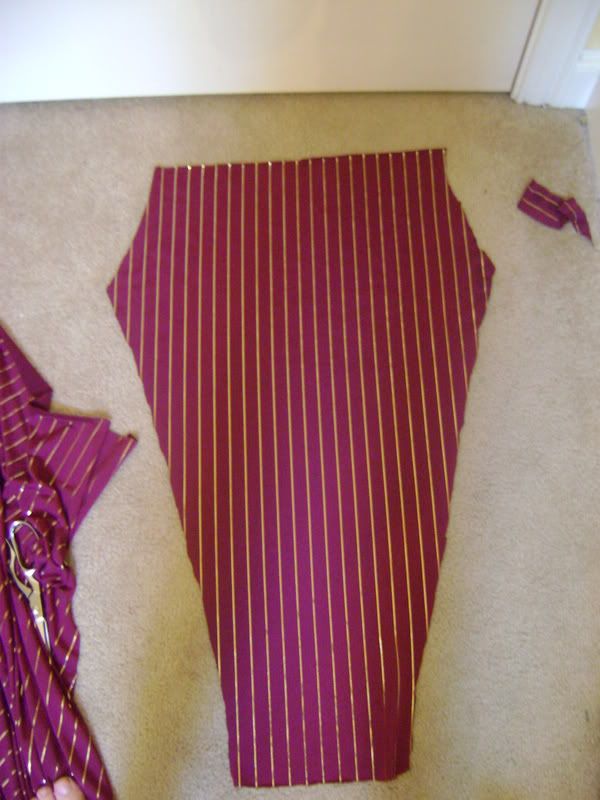
Now, flip your pants (still folded) over so that they are a reflection of what you've already traced. Trace the top, curvy side, and bottom again, so that you end up with the shape pictured above. Cut out. Make a second one just like it.
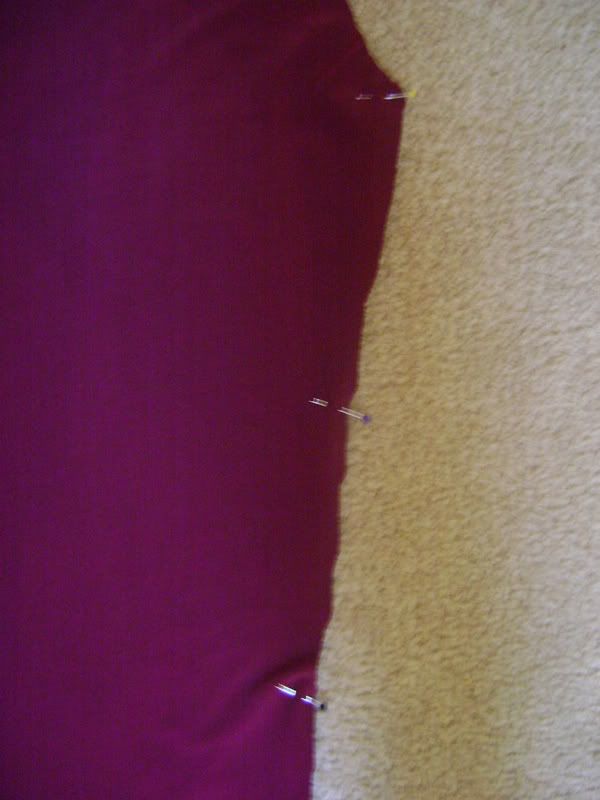
Now, pin each leg right sides together and sew down from the bottom of the crotch to the bottom of the leggings on each leg.
I forgot to take a picture of this step, but you pin the curved edges of each leg right sides together. When you sew this, you should be sewing from the front of the leggings down to the crotch and up the back all in one U-shaped seam.
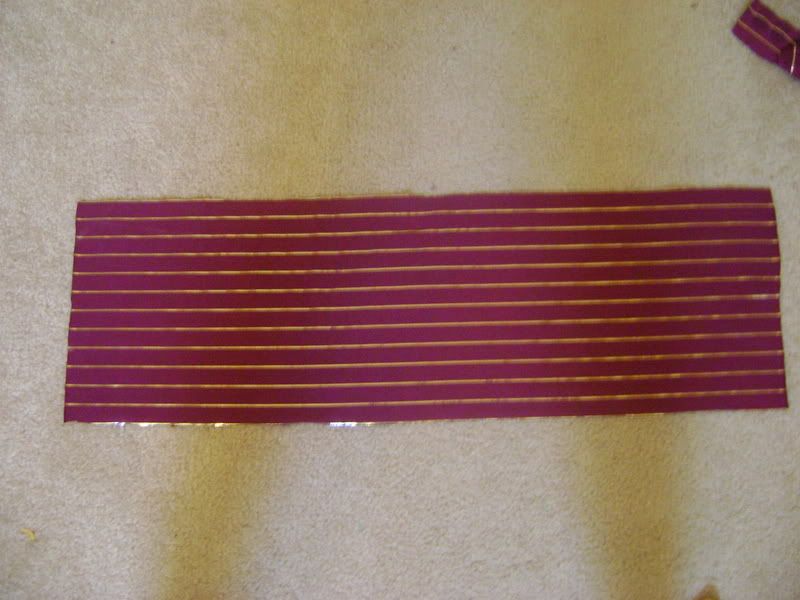
Measure the circumference of your leggings and subtract an inch. Cut a rectangle with a length of the measurement you just figured out and a width double the length you would like your waistband to be (You may want to go ahead and try on your leggings to figure out how long you think it will need to be). For mine I cut a rectangle with a width of 9 inches including seam allowance, so after it's sewn on I will have a waistband of about 4 inches.
Sew your rectangle closed with the two shorter ends right sides together so that you now have a circle.
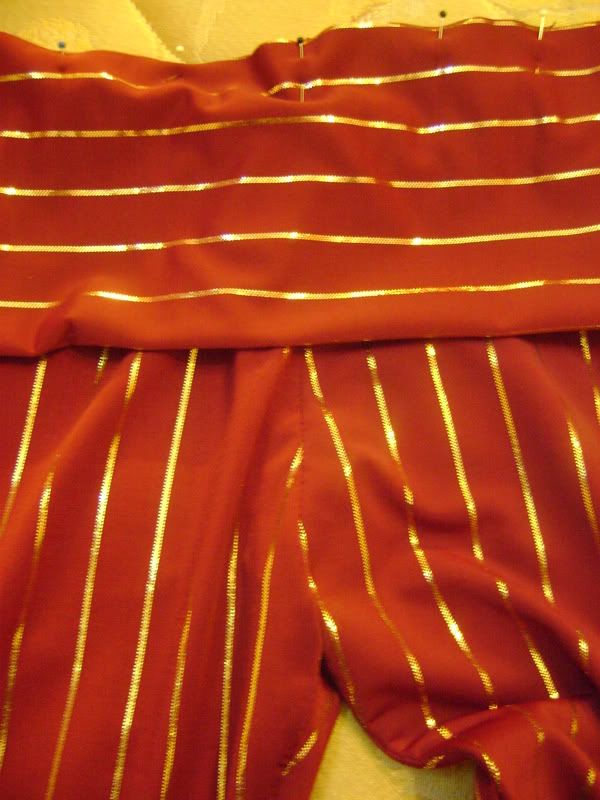
Fold your waistband in half widthwise wrong sides together. Take your leggings so that they are right sides out and pin the waistband evenly around the top. You will have to stretch the waistband a bit to get it around all of the way. Sew the waistband on, keeping the waistband material gently pulled flat while sewing.
Try on your leggings to make sure everything fits right. Depending on what you traced to get your initial shape, you may have to take the legs in a bit to make them tight, but once you get this pair made right you can use them as a guide for future pairs.
Hem the bottom. (Use a zig-zag stitch here... if you made your leggings too fitted at the ankle then you won't be able to stretch them enough to put your foot in if the hem isn't very stretchy.
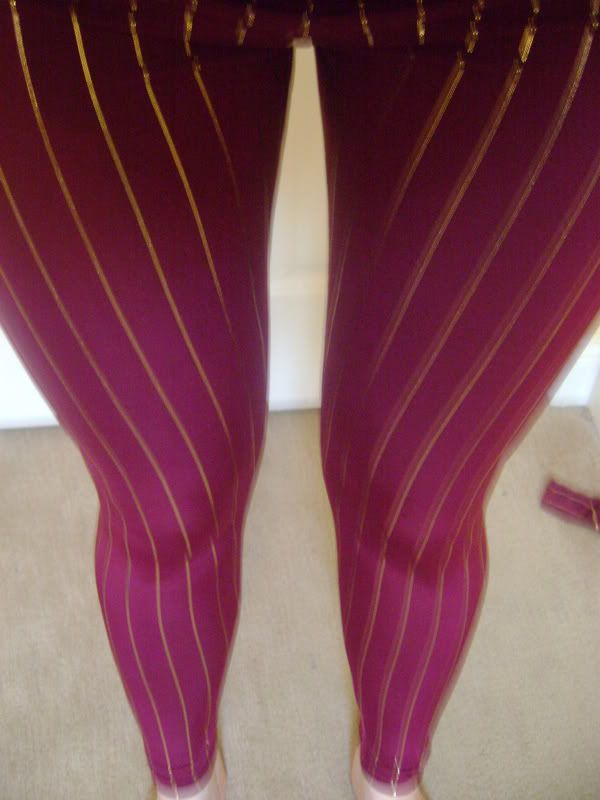
Try and fail at taking a picture of yourself wearing your new awesome leggings!
End tutorial.
Here is a link to the YouTube video I mentioned above. It also shows you how to have an elastic waistband if you'd prefer that. Link
I lost that pair of leggings a couple of years ago. Mom, if you find them, I'd like them please.
Tomorrow I will have pictures of the finished table. I'm so excited about it! I'm going to end this post here, because Othello is determined to fall asleep on my laptop and keeps getting angry by my typing.
--Laura
This has been copied and pasted from my original 08 tutorial. Notes I made today will be in parenthesis and in italics.
Tutorial:
Okay, so I promised this a while ago and just got around to it today. I couldn't find any fabric I wanted at first and I've been busy getting ready to head off to college next month. I've never written a tutorial for anyone before, so please ask me questions if I've worded something oddly or something doesn't make sense.
Materials:
1 yard (possibly more depending on your size) stretchy knit fabric (I like the kinds in the dancewear section.) (I wear around a size 6, if that gives you any idea. If you can wrap the fabric around you like a skirt and have a good amount left over on the sides, you're probably good.)
Matching thread
A pair of leggings or skinny jeans that fit you
Tutorial Notes:
Because we are using a stretchy fabric, I am using a stretch stitch on my machine. A serger would also work. I also sewed over each seam twice because they will be stretched so much and I wanted to add strength. If you aren't very experienced with sewing this kind of fabric, then please practice on some of your extra scraps left over from the pattern to get your settings right on your machine before risking ruining your leggings. (I've also heard of people doing a couple of rows of zig-zag stitches instead)
The process:
Lay out your fabric. Fold your leggings/jeans in half and lay out as seen in picture (except neater, I kind of just threw it down for the picture). Trace along the top, down the curvy side (the side with the crotch) and across the bottom, remembering to figure in seam allowances. Note: You may want to add more length to the bottom and/or top, just depending on what you're using to trace. (I made these leggings when I was 18 and didn't...um... have much in the booty department, so it didn't matter that the front was the same as the back. Since then I've been lifting weights and am a bit more well endowed in that area, I'd need to accommodate that by making the curved part more "shallow" on one side of each leg. I will link to a YouTube video at the end of this that shows what I mean.)
Now, flip your pants (still folded) over so that they are a reflection of what you've already traced. Trace the top, curvy side, and bottom again, so that you end up with the shape pictured above. Cut out. Make a second one just like it.
Now, pin each leg right sides together and sew down from the bottom of the crotch to the bottom of the leggings on each leg.
I forgot to take a picture of this step, but you pin the curved edges of each leg right sides together. When you sew this, you should be sewing from the front of the leggings down to the crotch and up the back all in one U-shaped seam.
Measure the circumference of your leggings and subtract an inch. Cut a rectangle with a length of the measurement you just figured out and a width double the length you would like your waistband to be (You may want to go ahead and try on your leggings to figure out how long you think it will need to be). For mine I cut a rectangle with a width of 9 inches including seam allowance, so after it's sewn on I will have a waistband of about 4 inches.
Sew your rectangle closed with the two shorter ends right sides together so that you now have a circle.
Fold your waistband in half widthwise wrong sides together. Take your leggings so that they are right sides out and pin the waistband evenly around the top. You will have to stretch the waistband a bit to get it around all of the way. Sew the waistband on, keeping the waistband material gently pulled flat while sewing.
Try on your leggings to make sure everything fits right. Depending on what you traced to get your initial shape, you may have to take the legs in a bit to make them tight, but once you get this pair made right you can use them as a guide for future pairs.
Hem the bottom. (Use a zig-zag stitch here... if you made your leggings too fitted at the ankle then you won't be able to stretch them enough to put your foot in if the hem isn't very stretchy.
Try and fail at taking a picture of yourself wearing your new awesome leggings!
End tutorial.
Here is a link to the YouTube video I mentioned above. It also shows you how to have an elastic waistband if you'd prefer that. Link
I lost that pair of leggings a couple of years ago. Mom, if you find them, I'd like them please.
Tomorrow I will have pictures of the finished table. I'm so excited about it! I'm going to end this post here, because Othello is determined to fall asleep on my laptop and keeps getting angry by my typing.
--Laura
Subscribe to:
Posts (Atom)